Micronet Bench Scanning is used as double check on items picked from picking slips. It allows a simple scanning mechanism to capture the goods picked and compare the items and quantities against the original order in Micronet. Any docket within the Invoice Creation process that is currently a picking slip can be recalled as a bench scan docket and checked.
Micronet Bench Scanning also has the ability to capture box assignments of items as they are being packed for later reporting.
To perform bench scanning, you first need to open the Bench Scan Entry screen.
There are two ways to do this - from the Invoice Creation screen and from the Invoice Header.
Refer to "Invoice Creation - File - Load - Load Bench Scan".
Refer to "Maintaining the Invoice Header (v2.7)" or "Maintaining the Invoice Header (v2.8)".
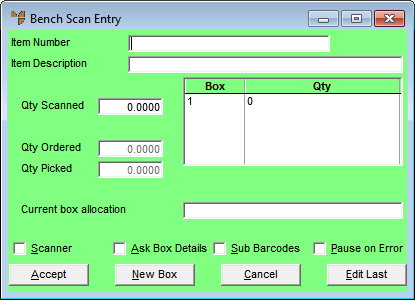
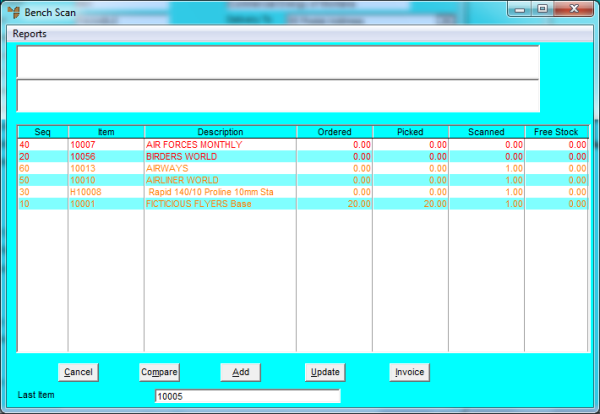
Micronet displays the Bench Scan Entry screen.
|
|
Field |
Value |
|
|
Item Number |
The way you perform bench scanning differs depending on whether or not the Scanner checkbox at the bottom of the screen is checked. If this checkbox:
Micronet displays the item and description on the Bench Scan screen behind the Bench Scan Entry screen. |
|
|
Item Description |
Micronet displays the item description. |
|
|
Qty Scanned |
If the Scanner checkbox is NOT checked, Micronet defaults this quantity to 1. You can enter the correct quantity scanned. If the Scanner checkbox IS checked, Micronet automatically enters a quantity of 1. If the same item is scanned a second time, the quantities are appended. |
|
|
Qty Ordered |
If the Scanner checkbox is NOT checked, Micronet displays the quantity ordered. |
|
|
Qty Picked |
If the Scanner checkbox is NOT checked, Micronet displays the quantity picked. |
|
|
Current Box Allocation |
Micronet displays the box number that the scanned items will be added to. |
|
|
Scanner |
Check this box if you want to enter the Qty Scanned for each item, or leave it unchecked to accept a default quantity of 1 for each item. |
|
|
Ask Box Details |
Check this box if you want to enter box details (such as weight and dimensions) when you select the New Box button. Leave it unchecked if you want Micronet to automatically create a new box and assign any additional items to the box. |
|
|
Sub Barcodes |
Check this box if you want Micronet to consider both outer and inner barcodes when comparing the quantity of goods checked / picked and ordered. Leave it unchecked if you want Micronet to attempt to match exactly the item entry against inventory in Micronet. For example: In your inventory, you sell a range of items that come in 12 different colours. Each of these 12 colours has its own unique outer barcode and product number in Micronet that is used for invoice creation, purchasing and stock control. These 12 items all share the same inner barcode attached to the product as your customers don’t need to track the inventory based on colours, but are just concerned about the range. When using bench scanning to check items, you often don’t have the outer barcode any more and only have the inner barcode that is associated with the 12 different items within Micronet. |
|
|
Pause on Error |
Overallocation of items during bench scanning (where the quantity scanned exceeds the quantity ordered or quantity picked) is considered an error by Micronet. Check this option if you want an error message displayed when there is an overallocation, which must be acknowledged before continuing, or leave it unchecked if you don't want the error message displayed. With both options, Micronet allows you to choose what is done with the overallocation. |
|
|

|
Technical Tip It is recommended you check the Pause on Error option when using remote scanners as it forces the error to be acknowledged before proceeding. |
|
|
|
Technical Tip 2.8 Feature You can press the F11 hotkey to display an item summary. For more information about the item summary, refer to "Displaying the Item Inquiry Screen". Select the Exit button when you have finished. |
Micronet redisplays the Bench Scan Entry screen so you can enter further items.
If the Ask Box Details checkbox is unchecked, Micronet automatically creates a new box and assigns any additional items scanned to this box.
If the Ask Box Details checkbox is checked, Micronet displays the Bench Scan Boxes screen.
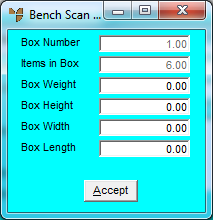
Enter the box details as required and select Accept.
Micronet creates the box, assigns any additional items to it and redisplays the Bench Scan Entry screen.
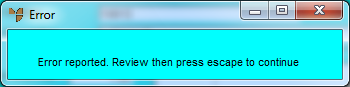
Press the Esc key to clear the message. Micronet displays the second error below.

Select Yes if you want to discard the overallocated amount, or No if you don't.
Micronet redisplays the Bench Scan Entry screen.
Micronet displays the item in edit mode. This is a useful function if you are using a scanner and you want to manually enter a quantity of goods.
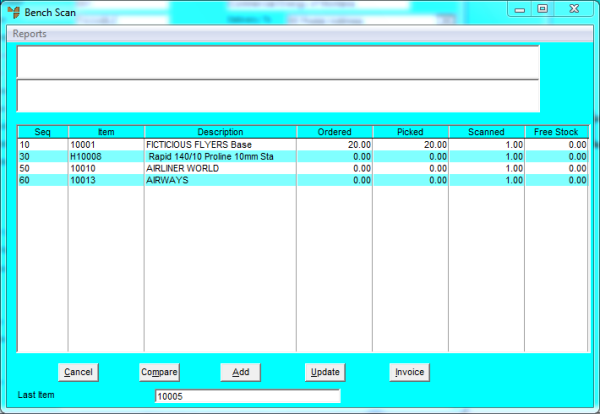
Micronet displays the Bench Scan screen showing the items you have scanned.
Micronet redisplays the Invoice Header.
Micronet redisplays the Bench Scan screen with items colour coded as follows:
The items are always sorted in order of red then orange then green to ensure that errors appear at the top.
Bench Scan – Compare
|
|
|
Technical Tip You can select the Compare button again to remove the colours from the screen. |
Micronet redisplays the Invoice Header.
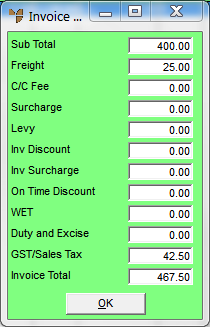
Micronet displays the Invoice Total screen.
|
|
|
Technical Tip Some of the fields on this screen may differ depending on how your system is configured and whether you are using any additional options including freight, minimum order surcharges, levies and discounts. User defined fees and charges are setup using the Miscellaneous Charges screen in your company configuration – see "Edit Company - Edit - Misc Charges". For example, the C/C Fee and Surcharge fields shown on the screen above are user defined miscellaneous charges. |
|
|
Field |
Value |
|---|---|---|
|
|
Sub Total |
Micronet displays the subtotal of all lines on the order, excluding additional amounts such as freight, levies, surcharges and GST. |
|
|
Freight |
Micronet displays any applicable freight charge from your Freight master file (refer to "Freight Master File"). You can change this or enter a freight charge if required. |
|
|
C/C Fee, Surcharge |
Micronet displays any user defined miscellaneous charges setup in your company configuration. In this example, you would enter the credit card fee that applies to this order, and any small order surcharge calculated, based on the total value of the order. For more information on small order surcharges, refer to "Edit - Program - Small Order Surcharge". |
|
|
Levy |
Micronet displays the levy (if any) entered on the Invoice Header. |
|
|
Inv Discount |
Micronet displays the discount (if any) entered on the Invoice Header. |
|
Inv Surcharge |
Micronet displays the surcharge (if any) entered on the Invoice Header. |
|
|
On Time Discount |
Enter any on-time discount the customer will receive for paying the invoice within a specified period of time. |
|
|
WET |
Micronet displays any Wine Equalisation Tax that applies to items on the order (liquor industry items only). |
|
|
Duty and Excise |
Micronet displays any duty or excise that applies to this order. |
|
|
GST/Sales Tax |
Micronet displays any GST or sales tax that applies to this order. |
|
|
Invoice Total |
Micronet displays the invoice total, taking into account all additional amounts entered on this screen. |
Micronet prints the invoice then redisplays the Invoice Creation screen.